
If there’s one skill that seems to be a historical mystery in terms of costume and dress, it might be millinery. How did they create those light-as-air, diaphanous, incredible, Edwardian hats?
Luckily for us, fashion and women’s magazines of the time occasionally offered advice for the home milliner who wanted to attempt to tackle these arts at home. Hats were *quite* an investment, so remodeling, remaking, or making from scratch was a skill that some economical women possessed.
In these days, purchasing the supplies alone might make you reconsider making- well- pretty much anything- but with the popularity and commonplace wearing of hats, the supplies weren’t nearly as rare as hens teeth, like the dwindling millinery supplies seem to be today. I remember a few years ago there was even a shortage of millinery wire! Surely, in 1905, the supplies were easier to obtain, with them not only being in-demand, but often domestically made (though, keep in mind, working conditions were notoriously bad in many factories- so domestically made didn’t always equal ethically made).
In this instance, it instructs the maker to purchase a pre-made wire hat frame. Oh, that we had such luxuries today, in period appropriate shapes!
So here, from May of 1905, let’s see what they suggest for “Making a Vacation Hat at Home”. I find the descriptions quite challenging, but perhaps it’s of the type that, once seen or tried first-hand, become easier with time. I have typed the article out for you to make it easier to read.
This remastered article was taken, by me, from an original period magazine. In fact, unless otherwise noted, almost all the source material on this blog, over the many years I’ve been doing it, are collected and edited from period originals by me. I don’t know that I’ve ever actually said that before!

Having ascertained, by trying on several hats, which shape is most becoming to you, purchase a wire frame. If you can have only one hat it should be as such as can be worn with all frocks, black, white, or cream is best. One very soon tires of any distinct color, but a well-made white or black hat may have a touch of color, which can be changed during the summer, and the hat thus freshened and given a new lease of usefulness.
One of the prettiest methods of covering a hat is shirred and tucked silk chiffon or net. If silk is to be used, first cover the frame quite smoothly with five cent crinoline muslin cut on the bias.
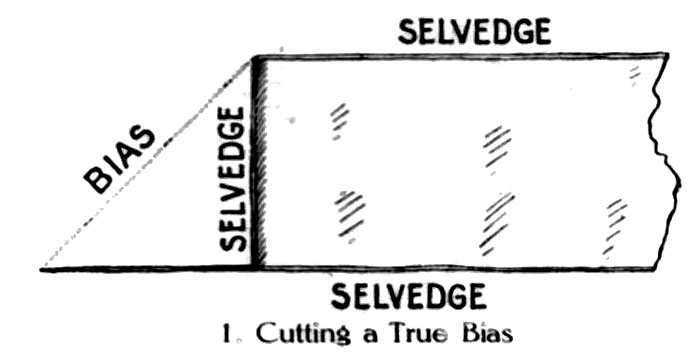
To cut any material on the bias, fold over the straight cut edge until it runs in line with the selvedge (Illustration No 1) , crease the folded line and cut evenly through.

Take care that this true bias is retained in any folds that are cut off, which is done by measuring along both selvedges, putting pins at the required distances and folding evenly over or making a line with a yardstick and pencil (Illustration No 2).
Cover the brim on the side next the face, unless it is a “mushroom” shape, which is covered on the upper side, cover the crown top to the edge and stretch a bias band around the sides, all fullness is cut away in V’s, the raw edges being just lapped. If the hat is to be of chiffon or net, cover the frame with the same material. Use fine thread and a long needle, and stitches about an inch long.
The method of shirring is the same for any material. Sheer goods are used on the straight, but silk on the bias.

Let us suppose that you are going to make a hat of tucked chiffon. Measure around the outer edge of the brim, which is, let us say, forty-five inches; measure also the deepest depth from the edge of the brim to the head-size, which may be eight inches. Allowing for one tuck half an inch deep to each inch, a one-inch ruffle at the edge, you will need two breadths of chiffon, each eighteen inches deep- that is, just one yard cut in half and joined at both selvedges. Now turn over one inch along one edge, durn pins in about every three inches with their heads up (Illustration No 3), cut a thread of silk a little longer than half your piece, and run evenly and finely from one selvedge to the other, then repeat this on the second half, leaving the threads not drawn up. Now lay the piece flat and even on a table, turn over at one inch below the first line of shirring, pin evenly all around, then run a tuck half an inch deep (Illustration No 4). Next, turn over one inch and a half from the last thread-line, and again run a half-inch tuck; repeat this till the piece is reduced to the depth of the brim.
Having bound the edge with a bit of chiffon laid fourfold, pin the edge ruffle on this all around the brim, darning the pins in downward, draw the threads up, dividing and evening the fullness all around, and sew to the frame by small invisible stitches on the right side; they may be an inch long on the other. Next, gather and sew the fullness inside the head-line, then draw up the tuck threads, and fasten off each one; the tucks do not need sewing down. If both sides of the brim are to be done in the same way, do the outside first, then, in sewing on the edge of the other side, slide the needle in a slant between the two so that no long stitches will appear on either side.

Measure around the crown edge and measure off a strip double the sides of chiffon (three times for net and only half as much for silk). Measure from the middle of the crown to the head-line, and allow double; join the piece so that it is round. Run a half-inch tuck along one edge and a thread in the other edge, which, when all the tucks are made in the same way as the brim piece, is drawn up tight, and finished neatly on the wrong side, then sewed on the middle of the crown. The edge tuck finishes the head line and the other tuck threads are drawn up and fastened off. Tulle hats are extremely dainty of this material; four times the circumference must be allowed. For a medium sized hat done in tucks it will take about two yards and a half of silk, two yards and a half of chiffon, three yards and a quarter of net, or twelve yards of tulle; this material includes the first covering in the sheer materials.
To cover a hat plain with lace, first take a paper pattern of the shape by which to cut the lace. Of the heavier laces, only one side of the brim is covered. If a full trimming goes on the outside the under brim is covered; the cut edge of the lace being turned up over the edge wire and finished with a plaiting of tulle chiffon or ribbon, a little garland of small flowers or straw braid; the head-line and the edge of the crown being finished in the same way. Or the edge may have a binding of silk or a fluffy edge of half a dozen deep tucks of chiffon run quite close together.
If sheer lace is used it may be put on both sides of the brim.
Flower and foliage hats are among the prettiest for spring and are quite within the scope of the home milliner. Cover the frame with cheap, very light-weight muslin, matching the flowers or leaves. Some milliners put on this a loose cover of chiffon or tulle to match, forming a soft, puffy bed for the flowers, which then need not be put quite so close together.
Flowers have their stems cut off and are sewed to the frame by their under petals. A brim of violets or flat roses with a crown of leaves is pretty; this method reversed is also good. The outer brim of an upturned hat and the top of the crown covered with flowers, the upper brim and the sides of the crown covered with chiffon or tulle folds or straw braid, is also pretty, and much lighter than all flowers.
Chiffon or tulle folds must be run on the foundation slightly full, lapping one-third an underfacing of such folds, on a large lace or straw hat, should have a plain foundation of the same material stretched on, on which to sew.
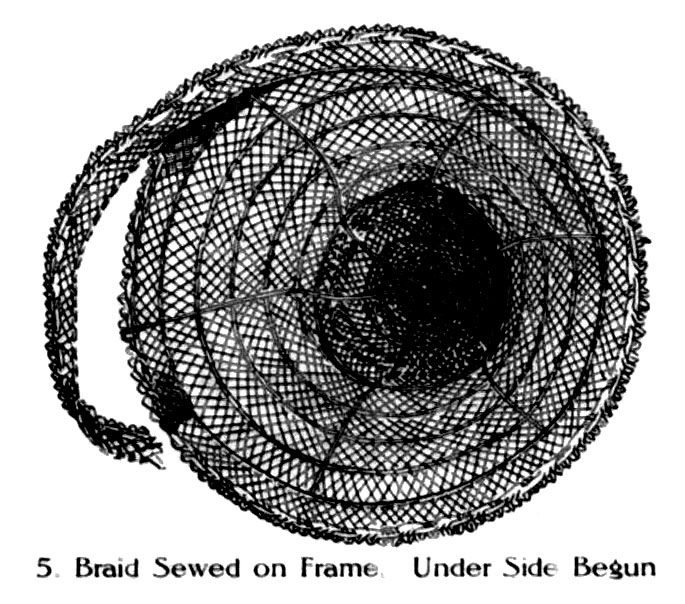
Sewing straw braid on a frame would seem to the uninitiated a very simple matter, but in doing it one may easily go wrong. Good straw braids can often be purchased very cheaply, and when converted into a hat, look and wear far better than a ready-made hat costing the same, because hand-made hats are always expensive. Remember that the less braid there is used the lighter the hat will be. If you intend having braid on both sides of the brim, begin at the back by sewing the braid on the edge wire, working from right to left, small stitches crossing the fibers on the right side and going through and over the wire with stitches an inch long. When the end is reached, turn the braid downward and carry it over in a slant till the edge just laps over the lower edge of the first row, then sew the two edges together, using small stitches on the right side; stretch the upper edge of the braid a little. Each row as it is sewed on should be stretched a little more, because the circle becomes narrower, and the braid must be as flat as possible. The wider the braid the more it needs stretching, but some braid cannot be stretched, in which case a running thread is put in the lower edge to draw it into the shape of the hat; in fact, this is a great help for many frames and many braids (See Illustration No 5). For dull straws use thread to match, for glossy braids use silk, and tie all fastenings off, or they will slip. The rows that do not go all around are cut where they end at the head line and turned up a bit against the crown, which, being done at last, finishes the brim.
The under brim, if of braid, is harder to do; it is begun and continued to the head line in the same was but the back of the stitches bust be slid into a slant between the two brims, so that no long stitches may appear on the surface.

The crown may be done in two ways. Begin by sewing a row around the head-line and continue to the edge of the crown, where a row should bend over the wire, and, by a strong running thread, be drawn flat on top; the rows are then continued round and round to the middle of the crown; stretching each one as you sew; finish the middle with a twist and fold under. The other way gives the effect of a ‘bell’ crown (Illustration No 6). You begin at the upper edge of the crown, letting the braid project two-thirds of the way, then sew around to the middle the same as in the first case. Begin the side by sewing a row of braid flat against the one forming the edge of the top, scallop to scallop, sliding the needle between so that no long stitches will show; draw the lower edge in a little by running thread and sew the second row onto this, not on to the frame (unless it is a “bell” shape), draw this row close to the frame and continue to the head-line.
For turbans one or two rows of braid to finish the upper edge are usually enough, as the trimming fills in the space. Large flat-brim or “mushroom” hats are prettiest with the under brim of chiffon folds or shirrings; or they may be covered with rows of narrow Valenciennes lace, which is run on a mousseline foundation cut to fit the shape.

Many pretty devices can be made from straw braid, with which to trim or partially cover frames; medallions, pines, squares, and rings, and interlaced basket-work effects. Or the frame may be covered like a big wheel or flower, with the rows of braid running from the edge of the brim to the crown, where they are, of course, more lapped. Then any girl who can sew or gather narrow ribbon or strips of silk or chiffon along both edges, and alternate rows of this with rows of straw braid. To make straw medallions, run flower wire, which costs ten cents a spool, at the lower edge of the braid (Illustration No 7), by which to draw it into shape; make the outside ring first, a little larger in diameter than the width of space to be covered, and sew round and round like the top of the crown. A hole may be left in the middle and filled in with a rosette of ribbon or chiffon, a flower, or an ornament.
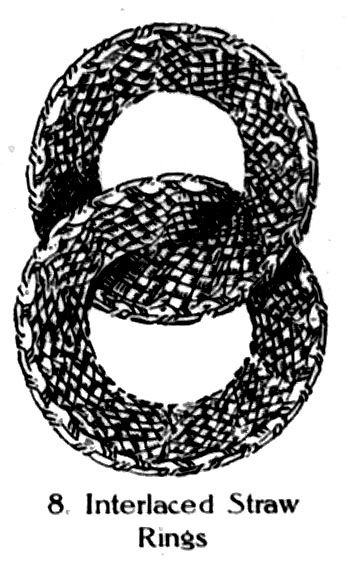
Rings (Illustration No 8) and squares are shaped in the same way; if they are to be interlaced the second one must be passed through the central opening before it is closed; these having one or two rows only; the frame is prettily covered underneath, puffs of chiffon or tulle coming up between and around the design.
Chiffon or tulle folds, kilted, and run all over a frame, make a charmingly dainty hat. The folds must be evenly cut, folded, two or three laid on each other, and firmly basted before sending to be plaited; then bastings should be carefully cut and removed.
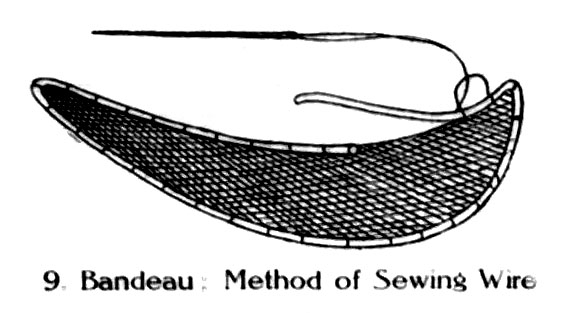
A very important accessory to the fit and pose of most hats is the bandeau, which may be bought at a small cost ready-made, but the amateur must study the effect of her hat on her head to find out just where it needs a tilt and how long and deep the band must be; this she can do with stiff paper. If the bandeau is made at home, make it of buckram or canvas and sew stiff wire around the edge as shown in Illustration No 9. If the head-size is large, carry a straight band right around, dropping it where the hat is to tilt. Cover nearly with black velvet.
Side note: The “bandeau”, as mentioned above, is not like a 1920s bandeau (or, sleeping-style headband), but was a small section added to the back of a hat, or sometimes at the side, to help it tilt on the wearer’s head. These made a resurgence in the 1930s, when tilting hats became the fashion again. You can see an example in the MET museum collection here– the bandeau a the back of the head is trimmed in the same way as the crown and brim. These “bandeaux” did exist in the 1890s as well, which is when they date this hat to, but it should be noted that museums are not foolproof with dating (the dating of hats, in general, is almost universally faulty, be it a museum or a selling atmosphere), so this particular hat could be leaning towards the Edwardian era, though I do suspect this one is *most likely* actually from the 1890s.