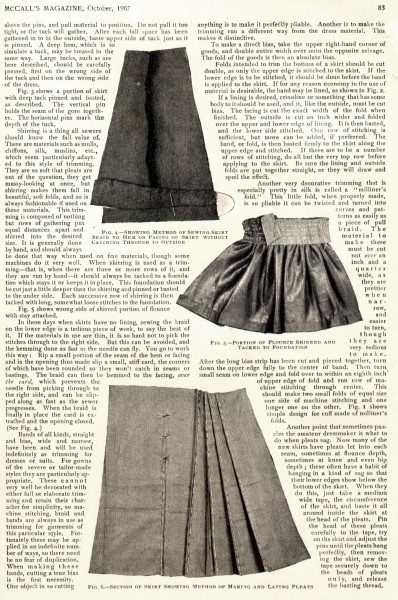
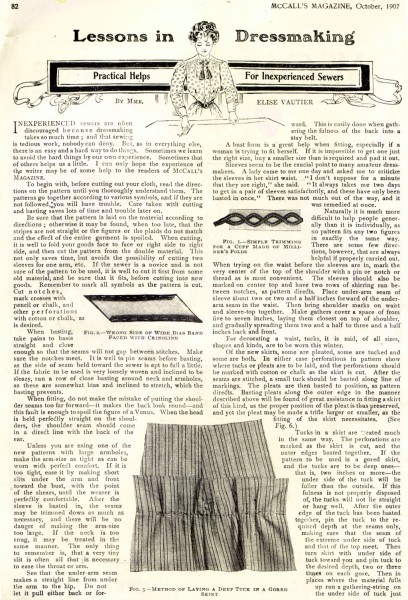
In my recent find of a 1907 McCall magazine there is this lovely article with dressmaking tips. I found myself nodding in agreement at many of the hints included in this article, while others had me stumped as they dealt with techniques I had never heard of.
I’m really interested in the title. I’ve seen debate over the last few months of the proper term for those who enjoy sewing. Stitcher, seamstresses, seamsters, sewists, or sewers, among others. I find it interesting that they unhesitatingly use the term “sewers”. English is such a funny language sometimes. Both those who sew and a place to gather muck are called sewers, though pronouced differently!
 Click on either image for a larger version to read or save.
The parts I particularly agree with are:
“Inexperienced sewers are often discouraged because dressmaking takes so much time; and that sewing is tedious work, nobody can deny. But, as in everything else, there is an easy and hard way to do things. Sometimes we learn to avoid the hard things by our own experience. Sometimes that of others helps us a little.”
“If the sewer is a novice and not sure of the pattern to be used, it is well to cut it first from some old material, and be sure that it fits, before cutting into new goods.” I would venture so far as to say it’s a good idea every time, especially if you’re doing different time periods, working with vintage patterns or reproductions, or a company you’re not familiar with.
Some of the sections I found most interesting were having to do with sleeves. Our perspective on sleeves has certainly changed over the last century or less. The fit and construction is so very different than it was one hundred years ago. Here are some bits I found particularly interesting, as it dealt with fit, construction, and even the way patterns were different:
“Unless you are using one of the new patterns with large armholes, make the arm size as tight as it can be worn with perfect comfort. It if it too tight, ease it by making short slits under the arm and front toward the bust, with the point of the shears, until the wearer is comforatable. After the sleeves are basted in, the seams may be trimmed down as much as necessary, and there will be no danger of making the arm size too large. If the neck is too snug it may be treated in the same manner. The only thing to remember is, that a very tiny slit is often all that is necessary to ease the throat or arm.” Obviously, this would be done in the mock up stage.
“Sleeves seem to be the most crucial point to many amateur dressmakers. A lady came to me one day and asked me to criticize the sleeves in her shirt waist. ‘I don’t suppose for a minute that they are right,’ she said. ‘It always takes me two days to get in a pair of sleeves satisfactorily, and these have only been basted in once.’ There was not much out of the way, and it was remedied at once.
Naturally it is much more difficult to help people generally than it is individually, as no pattern fits any two figures in exactly the same way. There are some few directions, however, that are always helpful if properly carried out. When trying on the waist before the sleeves are in, mark the very center of the top of the shoulder with a pin or notch or thread as is most convenient. The sleeves should also be marked on the center top and have two rows of shirring run between the notches, as pattern directs. Place under-arm seam of sleeve about two or two and a half inches forward of the under-arm seam in the waist. Then bring shoulder marks on waist and sleeve-top together. Make gathers cover a space from five to seven inches, laying them closest on top of shoulder, and gradually spreading them two and a half to three and a half inched back and front.”
I find it really interesting how the basic sleeve draft has changed! This is an interesting “between” stage between Victorian and more modern sleeves. By the 1930s the underarm seam of the sleeve matches the underarm seam of the bodice, like sleeves today. In the earlier periods these two seams did not match. I have been working on redrafting a 1910s bodice and I found this to be the case and was extremely interested in it (I knew the seams did not match in Victorian clothing but was not aware of this in-between stage of sleeves), so am very interested to read more about it in this article.
On the second page, the bit about the unlined skirt hem with braid has me a bit confused. It mentions using a card inside the hem to get it properly done. If anyone is familiar with this technique, please let me know, as I can’t quite wrap my mind around it without more illustrations. I find the mention of “milliners fold” on the second page quite interesting, too. It kind of sounds like modern bias tape! If anyone knows about that, please let me know, too!


JennR
January 17, 2012 at 12:01 pm (12 years ago)The hem braid is what many costumers call a ‘dust catcher’ or fold reinforcement. If you look closely at the picture, you see that there is a strip of fabric being attached to the hem, and it hangs a little below the hemline. This strip is intended to protect the actual skirt hem from excess wear, thus extending the wearable life of the skirt. It’s attached to the inside of the hem allowance with stitches that are (ideally) not visible from the outside of the garment. To make this stitching easier, you open out a bit of a side seam in the hem allowance, slide a piece of cardboard (or a ruler or a playing card — something that your needle will not go through) inside the already stitched down hem, and use it as a shield between the facing and the outside fabric, moving it along as you stitch. When you finish stitching the strip of fabric to the hem facing, you slide the card out through the opening you made in the seam and restitch the seam.
Lauren
January 17, 2012 at 12:08 pm (12 years ago)Ah ha!! Thank you, that makes so much more sense! I have done hem facings, but I have not yet done “hem braid” so was unfamiliar with how it was done. Your description made it click. Thanks!
Wendy Moyer
January 17, 2012 at 12:13 pm (12 years ago)Not that I have used it but I looked up in A Dictionary of Costume & Fashion the Milliners Fold and found this:
Edge of fabric folded four times and the thicknesses caughte together with a slip stitch or basting stiches so no stiches show on right side. Used as an edge finish or for folds in Millinery.
Cat
January 17, 2012 at 3:32 pm (12 years ago)Thanks for this resource! It’s very helpful to know about the sleeves, as I just picked up a 1908 dress pattern :)
Lauren
January 18, 2012 at 10:43 am (12 years ago)Glad you found it helpful! I hope the info on the sleeves helps you set them in :) I know I’m certainly going to keep it in mind next time I sew from an old pattern. And congrats on the 1908 pattern!
Hausfrau
January 18, 2012 at 2:25 am (12 years ago)Your remark that “Both those who sew and a place to gather muck are called sewers, though pronounced differently!” made me chuckle. For the longest time I had no idea that we all instinctively pronounce the word “polish” two different ways, according to context. Think “shoe” and the eastern European country.
Lauren
January 18, 2012 at 10:41 am (12 years ago)Hehe! Glad it made you laugh- sometimes I really love how kooky English is :)