

As mentioned in the last post, the proportions of standard body measurements were vastly different nearly 100 years ago than they are today. Why? Well, diet, exercise, but especially the use of foundation garments. Wearing foundation garments or corsets since an early age does affect the way the body is proportioned. We may be “curvier” because of diet today, but we don’t, in general, have the body shape of our grandmothers or great grandmothers because we simply haven’t been as restricted, and our bodies grow now as they would naturally, with no restraint.
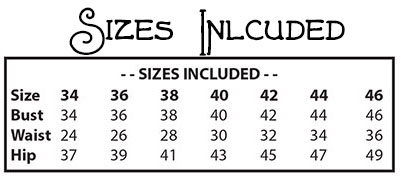
So, when choosing a size for the suit pattern, I realize that some of the larger sizes, while they’ll work for many ladies as far as bust, won’t work at all in the waist. I promised in our Facebook group to do a tutorial of how to enlarge the skirt pattern, so here it is, as promised!
First thing is first. Gather all your skirt pieces. There should be 4.
Enlarging this is going to be pretty easy, because the skirt is basically two BIG pieces.
– – – Here’s the Basic Idea – – –
The body grows proportionally. Because of this, we can’t “radial enlarge” everything evenly, like with a photocopier or overhead projector. It just won’t work! Sure, you may get lucky, but in general, it’s got to be enlarged in sections. Resizing patterns according to the proportional growth of a body is called “grading”. Jackets and things to fit the upper body are a royal pain to grade. Skirts, however, are easy. So fear not, this is really not as hard as you might think.
Think in terms of quarters (or a number divided by 4).
You mirror or cut on a fold the front and back. Now, if you think of each section of your body all the way around as a quarter (one center front, one side seam, one center back, one side seam) it helps make this easier.
To enlarge, it’s the most accurate to add at the center of the piece, right down the middle. If you’re doing something with a dart it’s different, but we’ve got no darts, so it’s no problem.
Here we do a little math.
Figure out how much bigger you need in the waist than what the largest pattern is. Let’s say, you need 6″ bigger. Take 6 and divide by 4. You will enlarge 1 1/2″ at each red line of the front and back skirt. 1 1/2″ x 4= 6″. Get it?
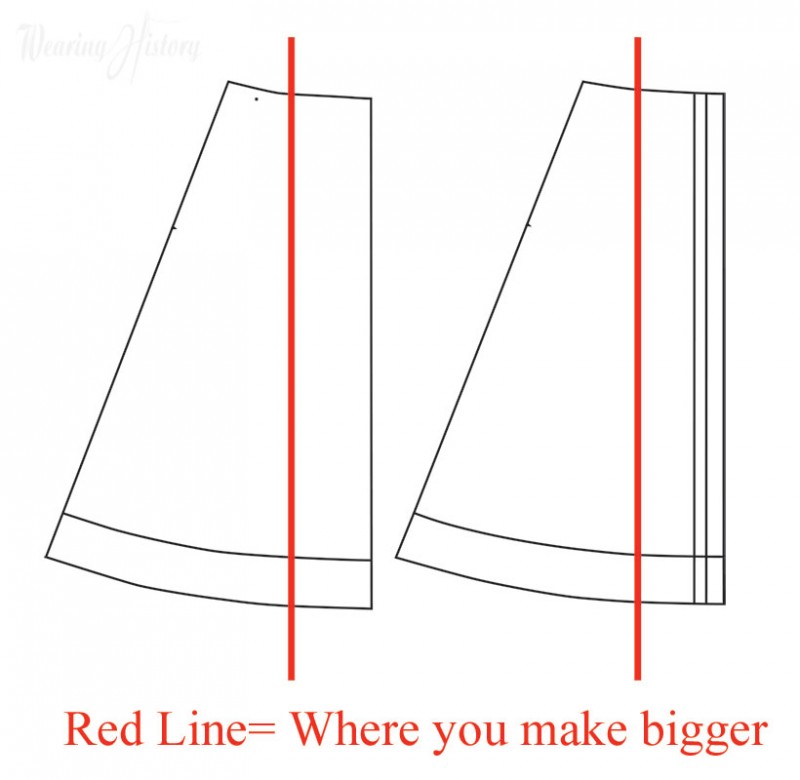
So, draw yourself a straight line, right on top of your pattern piece all the way down. Make it nice and visible. Now, cut right down the middle of that line. Sometimes I’ll give myself a cross mark before cutting, so I can keep the pieces better aligned.
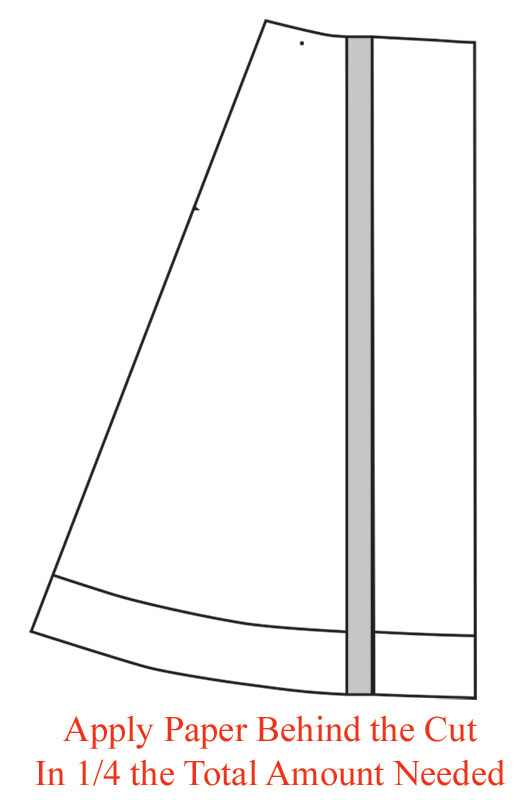
Tape a piece of paper behind the cut. Attach one side FIRST. Then draw 1/4 the total amount in a line parallel to the cut. (In the example, we’re doing 1.5″, so you’d draw a line 1.5″ from the cut). Then tape the other part of the pattern piece on that line. Do the same for the other side.
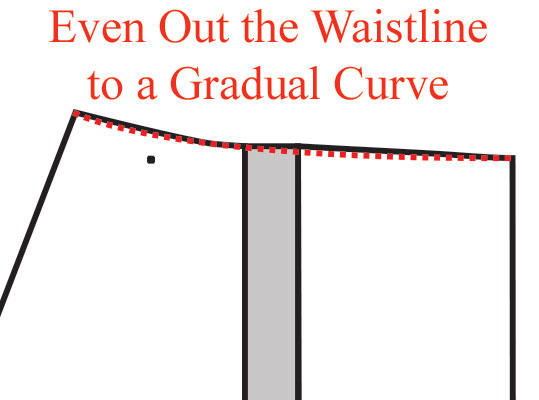
Now you’re going to “true up” your waistline. That means, just make the curve niece and pretty, so it’s a gradual line instead of bumpy.
Ta Da! That’s it for the skirt pieces. Easy, right?
Now, let’s do the belts.
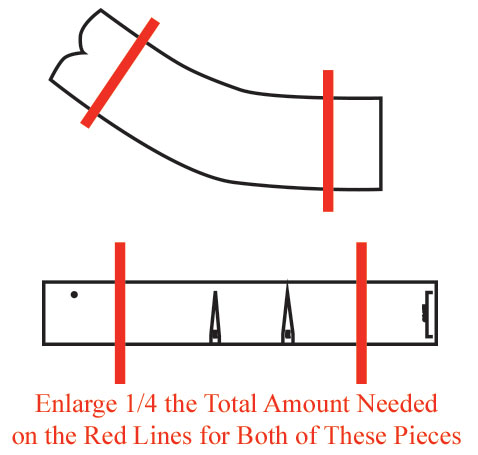
Because you cut each of these on the fold and they wrap all around the body (no side seams), you’ll draw two lines on each of these pieces.
Remember, we’re thinking of the body’s circumference in terms of quarters. You don’t need four pieces to go around, just two (as in, double the piece given, since you’ve been given half of the total body circumference).
If you imagine an invisible side seam on these pieces, it may make it easier to understand. On the straight belt, the side seam would fall between the middle of those darts.
In any case, you just do the same as before.
Remember, with the curved piece, you need to draw two lines at different angles– one parallel to the shaped front, one parallel to the center back. Otherwise your curve will be all wonky, and that’s no fun.
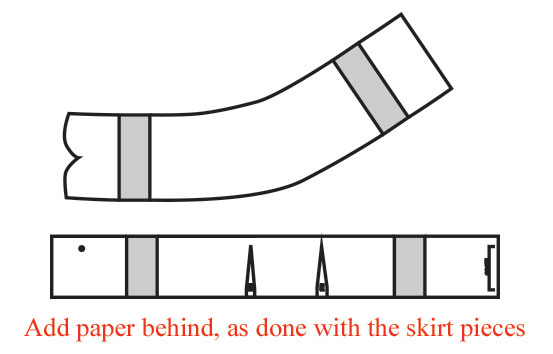
True up these pieces after enlarging, just like you did with the waist of the skirt pieces.
That’s it!
Now you’re skirt’s all enlarged. Go you!
For future reference, if you need to make a skirt smaller, you’ll do the reverse… instead of adding at the slashes, you’ll overlap the pieces in 1/4 the total amount you need to subtract.
Hope that helps!