
>All has been quiet here as I did a mad rush to finish a Regency ballgown for the Jane Austen Evening event! I have some more photos coming soon, but here’s some of what I did and my finished project!
I was brainstorming ideas and going through books and got several bodice sketches done, but after visiting Fashioning Fashion again I decided needed the bodice of the beautiful gown with the train in the collection. So I set about altering my Hunnisett bodice to do what the one in the exhibition did- well- a resemblance of it at any form.

Luckily I remembered to take my sketchbook with me to the lectures, so got a chance to capture the bodice front and back in more detail. The sleeves are similar enough to the sleeves of the gown I wore last year– so I can just use the same pattern, which thankfully enough is still neatly organized in a manila envelope. I found another image of the gown on LACMA’s website.
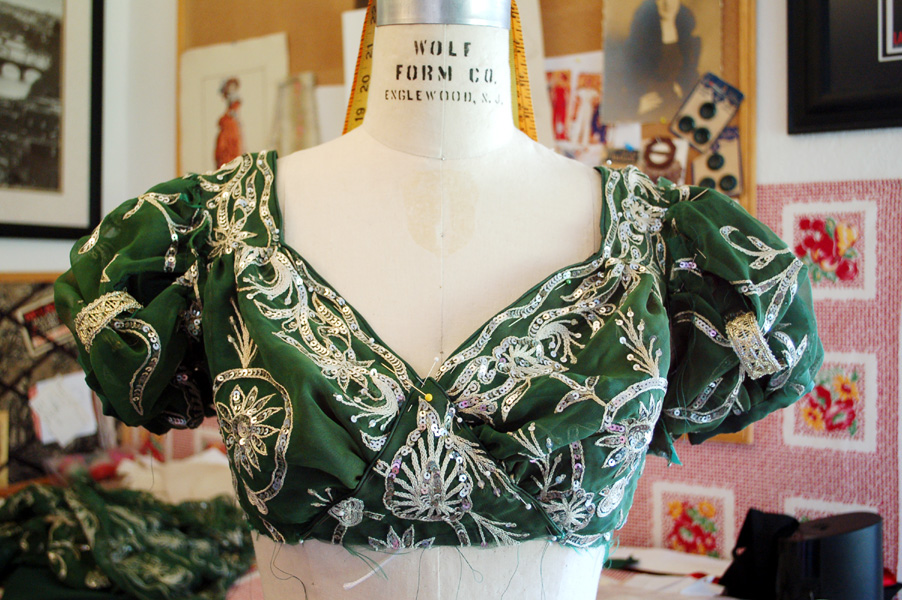
This is the fabric I used- a yummy green Indian sari with silver spangles, and a silk blend taffeta in green.
The bodice was the trickiest part for pattern making- I eventually just used the Hunisett pattern as a base and used flat pattern making to alter the front and back bodice.


I had a hard time squeezing in sewing time last week. I actually sewed one of these sleeves three times- twice the wrong way, then I figured out I sewed two of the same under sleeve. They’re curved very similarly, so I had flipped them all around trying to figure it out, but finally got it. Notches, they are your friends. I should have used them. In a moment of pure insanity I actually sewed and finished the facings of two of the slits by hand- and then remembered I had just three days to finish the whole gown.
I finished the front bodice piece with a piping of the green taffeta and then pinned the center front bodice and gathers to position and tried it on for fit (as the dress form is a bit bustier than I am) and hand sewed in the space between the fabric and piping so it wouldn’t show. After the skirt was attached I marked the hem length for the underskirt and hemmed it. It was probably a bit of a backward way to do it, but it worked. (Never mind the sewing disaster area- creative process and all that)

The ball last night was fantastic! I’m still somewhat recovering, but here’s some shots of my finished dress and turbany hat thing. All the dress was finished and sewn! The turban was sewn as a hat and the trim was pinned into place. Still, it was finished all rather quickly and I was happy with the end result :)


If you are interested in this period make sure to check out Beth’s blog Fashioning Beau Brummel– it was great fun to talk of our projects, and the ensemble she made her husband was just fantastic- not to mention her own lovely gown. She just started another great blog that I think you’ll all enjoy- V is for Vintage!
Pandora
January 23, 2011 at 11:20 pm (13 years ago)>wow, what a fantastic outfit!
Gina
January 23, 2011 at 11:25 pm (13 years ago)>OH that is SO COOL! I love that fabric and plume in the hat!! <3
Katherine
January 24, 2011 at 12:31 am (13 years ago)>You look absolutely stunning, it's a fabulous dress.
eileensbasement
January 24, 2011 at 12:34 am (13 years ago)>Literally breathtaking. Job amazingly well done for being sewn in such a short amount of time!
eileensbasement
January 24, 2011 at 12:35 am (13 years ago)>Job amazingly well done for such a short amount of time. It's literally breathtaking!
BaronessVonVintage
January 24, 2011 at 2:23 am (13 years ago)>oh, how FANTASTIC!!!
Miss Tami Lee
January 24, 2011 at 2:38 am (13 years ago)>Oh my, that turnedout so beautiful!
Rose and Ivy
January 24, 2011 at 4:15 am (13 years ago)>Absolutely beautiful!
Beth
January 24, 2011 at 6:51 am (13 years ago)>It was so great seeing you last night, and our husbands looked smashing together! And thanks for the blog shoutout – I'm hoping to get my outfit recap up tomorrow!
Renate
January 24, 2011 at 9:20 am (13 years ago)>Beautiful fabric and cut! I have many Regency dresses as well and the result is always elegant and timeless.
Debi
January 24, 2011 at 10:21 am (13 years ago)>Oh WOW! This is AMAZING! I love it! Going to check out those other blogs now!!!!
Alli
January 24, 2011 at 10:26 am (13 years ago)>Wow! You look amazing. The dress is stunning. You've made it beautifully
superheidi
January 24, 2011 at 3:09 pm (13 years ago)>Besides stunning you look quite regal!
Janice
January 24, 2011 at 3:40 pm (13 years ago)>You look beautiful! Well done!
Lauren
January 24, 2011 at 5:17 pm (13 years ago)>Lovely!
Miss Rayne
January 24, 2011 at 6:35 pm (13 years ago)>Stunning I love regency orientalism
Elegance of Fashion
January 24, 2011 at 7:02 pm (13 years ago)>I love the details in the bodice, the sleeves, and towards the bottom. Very lovely!
casey
January 24, 2011 at 7:28 pm (13 years ago)>Lauren you look stunning! :) (And that fabric… *drools*) Completely mad for whipping that up in just days, but being a chronic last-minute-seamstress myself, I shouldn't talk. haha! Beautiful job–bravo!!!!♥ Casey | blog
Lauren
January 25, 2011 at 1:15 am (13 years ago)>Thank you so much, everyone!!
Serena
January 25, 2011 at 5:10 am (13 years ago)>This is one of my favorite Regency dresses ever! It's so beautiful and it looks great on you!
Ruth
January 27, 2011 at 2:11 am (13 years ago)>That dress is stunning. I am about to start on a regency ball gown, and your posts have been a big inspiration to me, thank you :)
Heather Allynn
November 21, 2011 at 4:39 pm (12 years ago)Would love to hear what you learned from this project and what you would approach differently. Making sari dress for JA 2012. Will take any advice I get. Hope to see you at JA 2012.